In today’s digital world, data is an omnipresent entity. It is as significant as currency and needs to be adequately safeguarded. However, with digital technologies having multiple challenges, data in the digital environment is susceptible to various kinds of cyberthreats. To combat an infinite number of disasters from disrupting your business, you need a robust disaster recovery (DR) plan.
Disaster recovery (DR) testing forms a quintessential part of any disaster recovery plan. An effective DR testing involves assessing the steps within an organization’s business continuity and disaster recovery (BCDR) plan, which is critical when preparing for operational disasters. With regular DR testing, you get a better understanding of whether your organization can restore operations within the planned time in the event of an operational disaster. This prior understanding helps amend the DR plan and fixes any weak links in the BCDR strategy before a real disruption occurs.
Testing your DR plan once isn’t enough; it should be tested at regular intervals. Regular DR testing ensures your DR plan can stand the test of time. With patch updates and the latest versions of software installed in the systems of organizations coming up regularly, the DR testing procedure must undergo modifications accordingly. Even the regular addition of new systems pushes for changes in the testing framework.
Despite its importance, many organizations do not perform DR testing frequently or thoroughly enough, often due to challenges regarding the time it takes to conduct it, the resources required and the potential disruption to production workloads. Without proper testing, however, any number of issues could hamstring recovery efforts in the wake of a disaster. For example, improper replication of network configuration and application dependencies failing to sync across sites may result in failed recoveries. Still, DR testing is often viewed as a low-value, time-consuming activity that doesn’t get the prioritization it should.
However, it doesn’t have to be so.
With Unitrends Unified BCDR, you get automated DR testing locally and in the Unitrends Cloud. Our Recovery Assurance software works with your backup appliance to automatically test and certify your recovery objectives and service-level agreements (SLAs) ahead of time. The key to recovery confidence and resiliency is our Data Copy Access.
What is Data Copy Access?
Data Copy Access (DCA) is a job type available with Unitrends Recovery Series appliances and Unitrends Backup Enterprise Plus level license. You can configure DCA jobs to run in any one of the following three modes:
- Run Test (Recovery Assurance) validates that backups fulfill requirements specified in your business continuity/DR plan. This involves testing for RTO/RPO compliance, malware infection and application behavior in a failover scenario. You may configure Recovery Assurance testing to run on a schedule or on demand.
- Instant Lab enables access to production data in fully functional virtual machines (VMs) within isolated testing labs. This particular mode may run on demand and is to remain on the test network until torn down.
- The Failover mode orchestrates application and system failover from certified recovery points to a predefined recovery target in the event of a disaster. It may run on demand as well.
These job types enable users to utilize their existing backups to fulfill various use cases, such as:
- RTO/RPO compliance testing
- Application-level testing and certification
- On-demand labs (testing, development, QA, business analytics, post-ransomware recovery, sandbox)
- Disaster recovery
The location to run DCA job(s) depends partly on your protected environment and your Unitrends backup deployment. You may run them on a designated virtual host (VMware ESXi, Hyper-V), directly on a physical backup appliance or a combination of both.
The following asset types are supported for each scenario:
- On-Host DCA — Image-level backups (Windows), host-level backups (VMware, Hyper-V), and replicas (VMware, Hyper-V, Windows image-level replicas and Windows file-level replicas).
- On-Box DCA — Image-level backups (Windows).
Running a DCA job on your ESXi or Hyper-V host provides full network connectivity, utilizing all job modes and custom application tests. Currently, on-box DCA jobs do not provide any network connectivity. Instead, they utilize the Run Test mode to activate VMs for proper functioning, test resource configuration, track RTO/RPO compliance and enable backup screenshot verification.
How is Data Copy Access configured?
DCA jobs are configured and managed through the Jobs tab in the Unitrends User Interface (UI). Under that tab, once you click on Create Job and select Data Copy Access, our wizard takes you through the job configuration process.
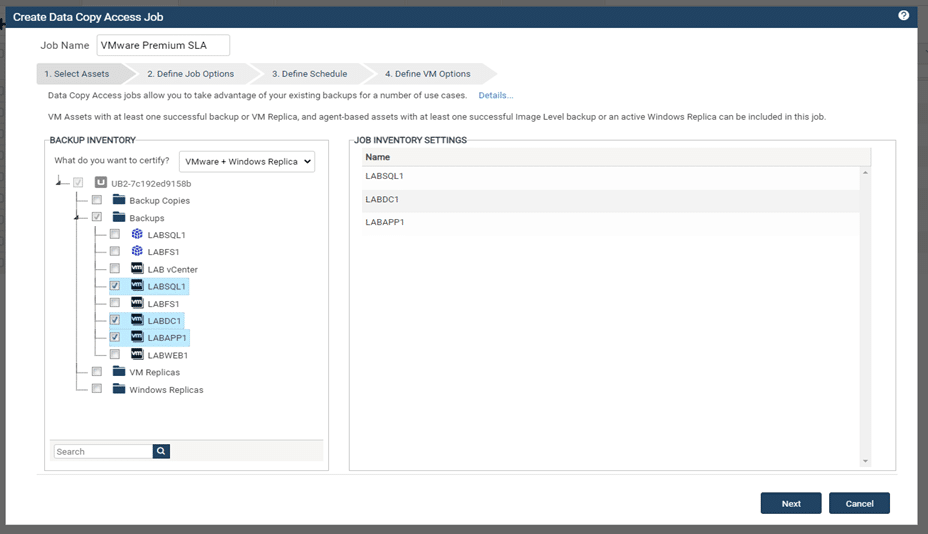
Step 1: Select Assets
This is the first step, where you have to determine the assets (backups, backup copies, replicas) from your backup inventory that you wish to include in the job. You can also give a custom name to the job.
Step 2: Define Job Options
The second step involves configuration of Lab Profile(s) to quickly assign location, networking and compliance tracking settings and use them as per requirement for each of the three DCA modes.
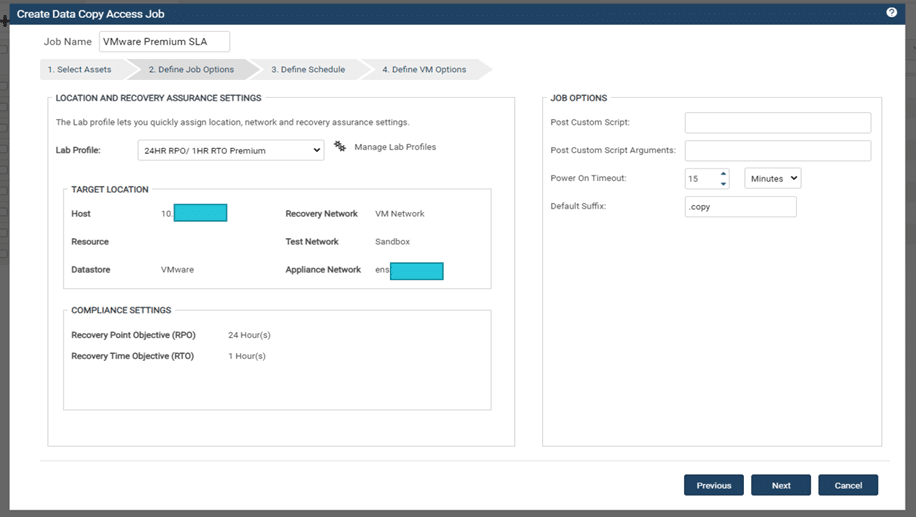
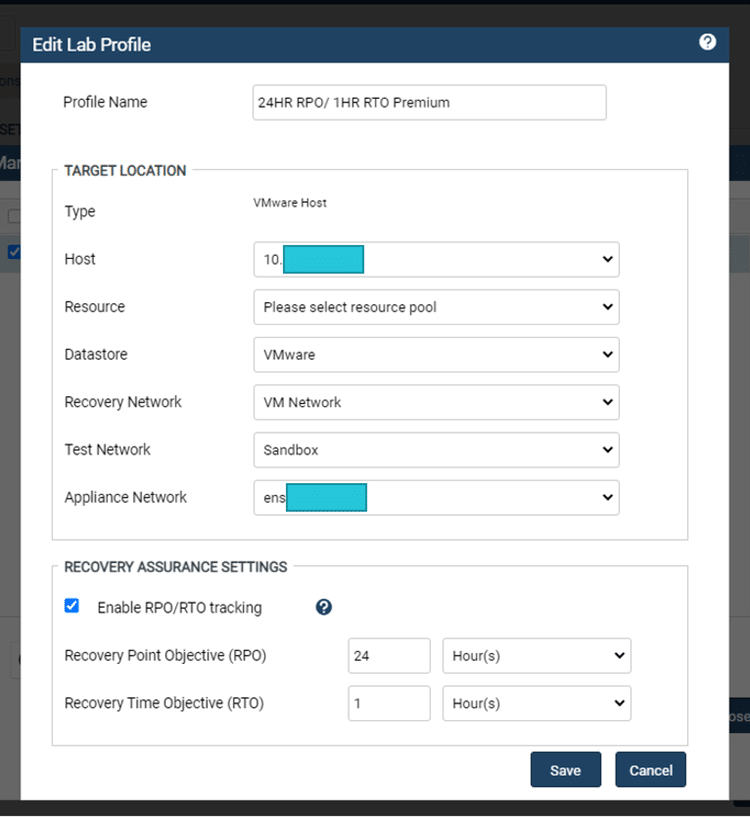
*Please note there are two network options. The Recovery Network (in this case, the production VM network) will be used in a Failover scenario. Test Network is an isolated network separate from production. Before running tests and standing up instant labs, you must configure an isolated test network on your hypervisor, so they don’t interfere with production.
Multiple Lab Profiles can be established and stored within your backup environment.
Step 3: Define Schedule
In this step, you will determine a schedule (or run on-demand) for the Run Test mode, including start date, days run, job start time and intra-day recurrence (in intervals of hours or minutes).

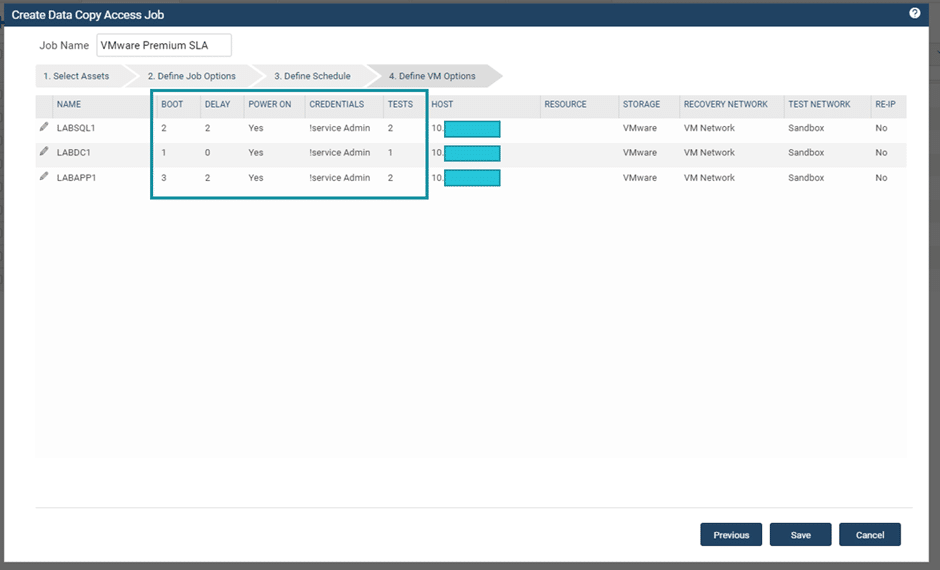
Step 4: Define VM Options
In this final step, you need to configure the settings for individual assets (in this case, VMware host-level backups) to test your DR runbook.
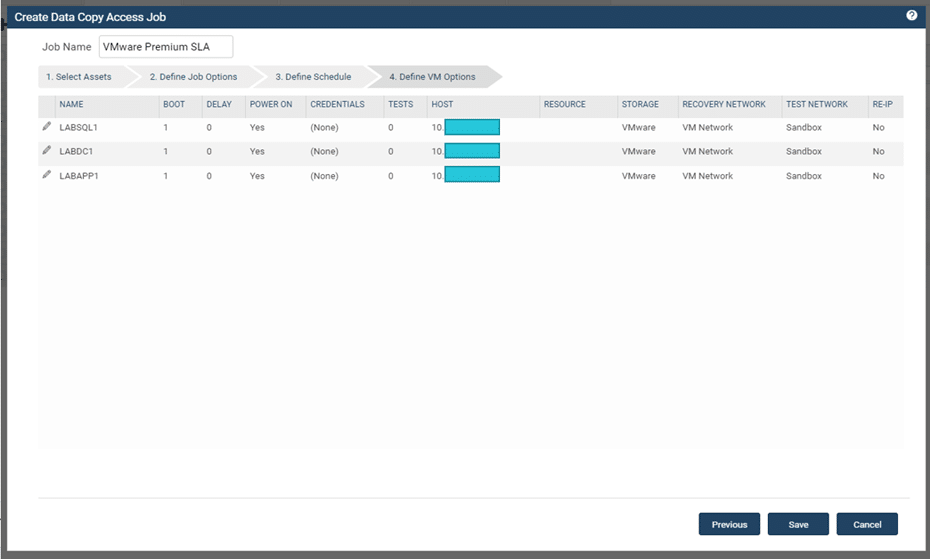
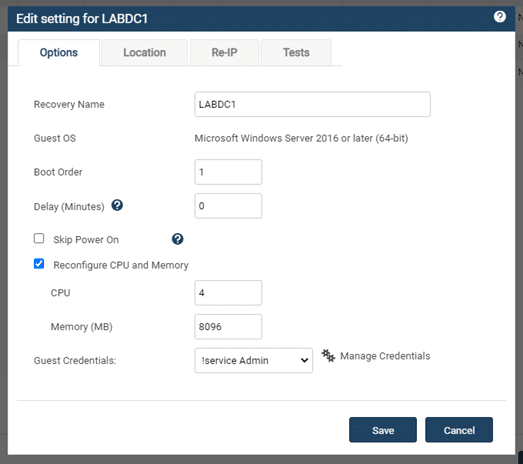
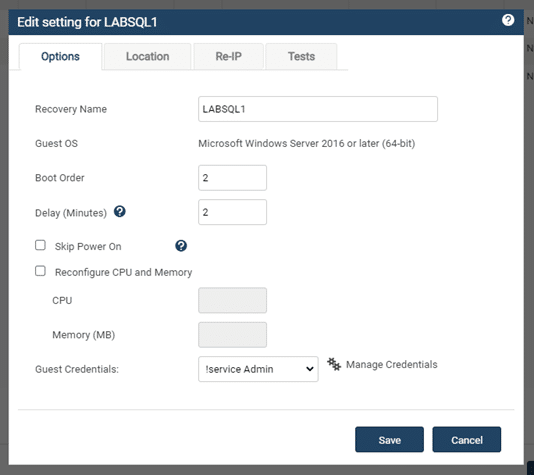
Options
Under the Options tab, you can rename the VM upon recovery, view guest OS for the VM, set boot order and delay (determines delay in minutes before custom tests or Re-IP of machines after the VM is powered on). You can skip powering on the VM, reconfigure CPU and memory (replacing the CPU and memory settings present in the VM during the backup) and select the guest credentials used to log in to the VM.
Location
The Location setting can further customize resource pools and datastore (VMware) or storage (Hyper-V) and the recovery network for individual assets. These settings will override Lab Profile settings.
Re-IP
You can assign new IP settings to the VM for use in testing and failover. When the DCA job validates your VM on either recovery or test network, the IP settings configured under Re-IP replace the IP address the VM was configured with during the backup.
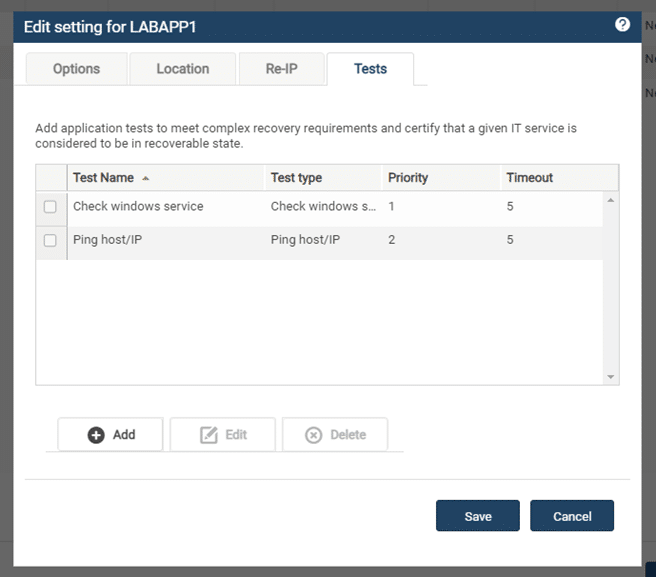
Tests
These are the final options for configuring each asset in the DCA job. Such application-level tests validate complex recovery requirements to certify that a given asset and its related IT services are in a recoverable state. Unitrends has preconfigured over 50 application-level tests for a variety of Windows services. You may also scan drives and folders for malware and configure your own custom scripting to test (currently available for on-host only).
What are the outputs of a DCA test?
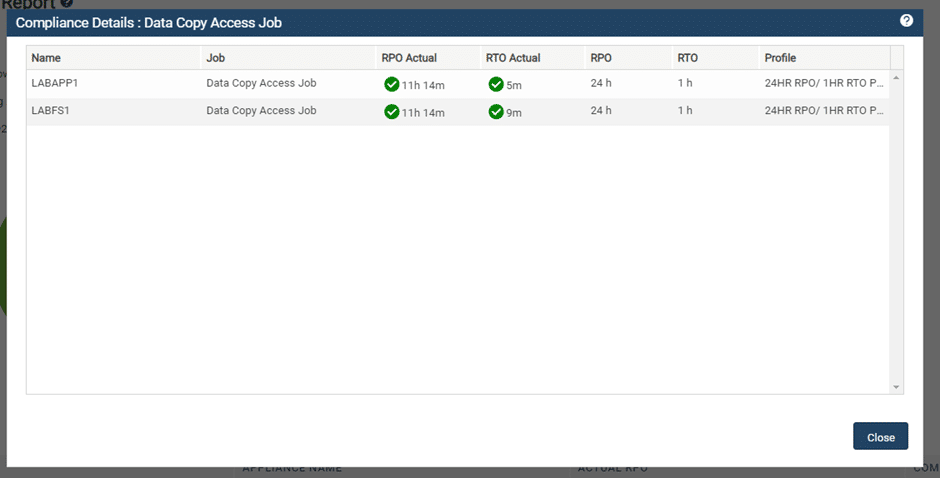
DCA tests generate two key reports: Compliance and Recovery Assurance. In case of the Recovery Assurance tile, the summary information gets displayed on your dashboard.
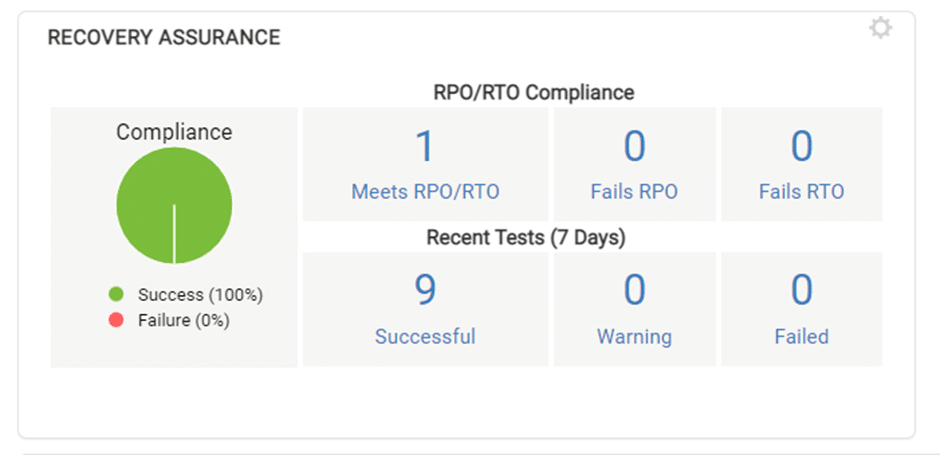
Clicking on any of the tiles under RPO/RTO Compliance or Recent Tests takes you directly into each respective report for additional information. Both report types are exportable from your backup appliance in .csv or .pdf format.
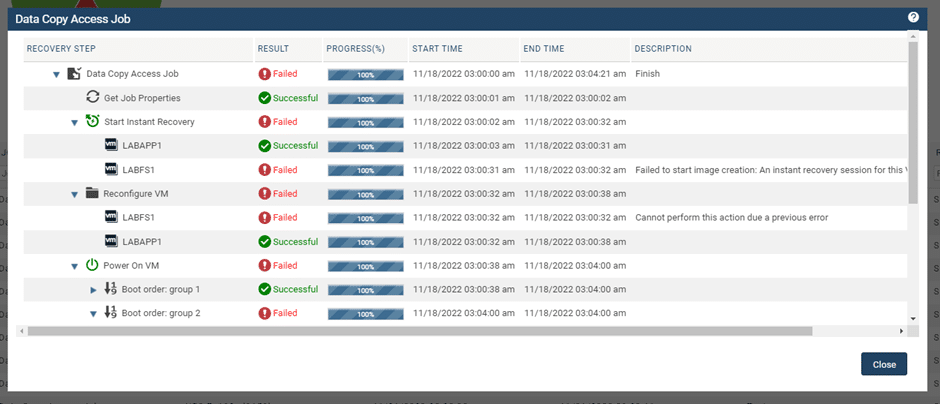
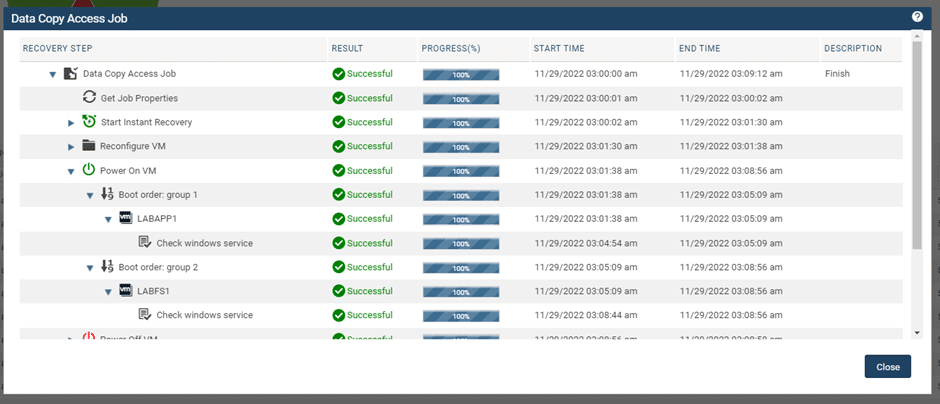
Recovery Assurance report
In this report, you can view the step-by-step status of your configured tests. The job is marked as a failure when the test is unsuccessful and the failed steps are identified. This enables proactive troubleshooting and resolution of any issues or errors prior to backups required in a DR event.
Recover confidently with Unitrends
While other backup and recovery vendors perform partial recovery tests on servers and applications, with Unitrends you get the most comprehensive recoverability testing in the industry. There are more than 50 tests to choose from in the Recovery Assurance feature of Unitrends, which automatically delivers results in a comprehensive, easy-to-read graphical report. This ultimately enables delivery of documented proof and confidence in the recoverability of your applications.
Want to see Unitrends in action? Schedule a demo with us today.
Also, to obtain additional information about Data Copy Access jobs configuration, work with reports and more, consult the Unitrends Administrators Guide.